Conda Virtual Environments with Jupyter
As a novice who just started learning Python just three months ago, I was clueless about what virtual environments were. All I knew was that Anaconda was purportedly a good way to download and use Python, in particular because it came with many scientific packages pre-installed. I faintly remember reading somewhere that Anaconda came with conda, a package manager, but I didn’t really dig much into it because I was busy learning the Python language to begin with. I wasn’t interested in the complicated details—I just wanted to learn how to use this language to start building and graphing and calculating.
And because I had on idea about how to use Anaconda or conda for that matter, I used to install packages left and right, using the pip installer through the command
pip install some_package
or through the conda installer, with some optional arguments and channel specifications that Google and stack exchange search would tell me to do. For a package available on conda-forge, I might have triggered a command something like this:
conda install -c conda-forge some_package
Little did I know back then that, my abusing these installation methods, my system root directory was being clogged up with so countless Python packages and modules. The reason why I never bothered to dig into the intricacies of these installation options was that I never felt the need to: they almost always worked. After installing a package, I had no trouble importing it on PyCharm or Sublime. Of course, there were some packages that simply didn’t work, such as PyPDF, but those were extremely rare, and I was always able to find an alternative package with similar functionality. Admittedly, this in large part because the packages I use most often are extremely standard, such as numpy, matplotlib, and occasionally scipy and sklearn, all of which are shipped with Anaconda by default.
Problems started to arise only recently when I decided to starting learning R to expand my knowledge in the domain of statistical computing. After some quick research, I found that there were two ways of installing R on a local system. The most popular and easiest way was to download it straight from CRAN, the Comprehensive R Archive Network. This was the course I followed first, and it was great—until I realized that the better way to go would be to manage everything with conda through virtual environments. Instead of a system-wide installation of R, why not create a designated space for R within conda, and use Jupyter Notebooks from there? This question led me down a rabbit hole of stack exchange questions and Medium posts. I summarize my findings here.
Conda Virtual Environments
Installing R with conda could quite easily be achieved with a single command line.
conda install -c r r-essentials
This command installs both R and the r-essentials package, which includes approximately 80 most popular scientific packages for the R programming language. Great! It took a few minutes for my laptop to complete the installation, but it eventually got through. Now, I should be good to go, right?
Only, I noticed a few problems. First, when I opened a new terminal window, I realized that it took noticeably longer for the terminal to load. The bash shell seemed to look up multiple languages, such as python, java, and r before fully loading, which I figured was a problem—even to the uneducated eye, this meant that the system was unnecessarily clogged. It didn’t take me long to realize that the cause of the problem was that all packages were being installed in the root directory of my system as mentioned earlier. This is not the recommended way of installing packages: in fact, the reason why we have package managers like conda is precisely to prevent users from installing everything in the root.
Conda allows users to create what are called “virtual environments.” The simplest way to think about virtual environments that they are isolated universes where different packages live. Having these isolated worlds is convenient because it means that users can install different versions of the same package. For instance, in a virtual environment called world 1 (a dumb name for a virtual environment, I know), we might install numpy version 1.1; in world 2, numpy versiosn 1.15. Why might we want to do this? Well, certain libraries that use numpy as a dependency might require a specific version of numpy. If we didn’t have virtual environments, we would have to downgrade numpy installed system-wide on the root directory, and who knows what other compatability issues might pop up after the forced downgrade. Virtual environments is essentially a very convenient way of managing where packages are installed while leaving the root directory clean and uncluttered.
So the solution to my problem was simple: perform a conda reset to clean the root directory, which was then cluttered with both Python and R modules. Then, create virtual environments each for Python and R and reinstall modules as necessary. Through this, what I wanted to achieve was a clean system root environment, with all packages installed in specific virtual environments that I could toggle on or off depending on my workflow.
Reset Conda Root
Resetting the conda root environment can simply achieved with a single line of command. On the terminal, type
conda install --rev 0
This will delete all pacakages installed in the root directory and revert the system back to where it was when we first installed Anaconda. Note that this includes the r-essentials package we installed earlier. Before running this command, I obtained a list of all libraries installed on the root just to see exactly what packages I had installed would be erased. To see the list of all available modules, type
conda list
and the terminal will display the list of all packages installed in the current environment.
After the resetting was complete, I ran a quick conda update command to make sure that all libraries werre up-to-date.
conda update conda
Now that the root directory has been unclogged, it’s time to create virtual environments and reinstall packages onto our system!
Create Virtual Environments
Creating virtual environments is very easy. To create a Python conda virtual environment, just type
conda create -n python_env_name python=x.x
If you want to create a conda environment with all Anaconda packages pre-installed, add anaconda as an optional argument.
conda create -n python_env_name python=x.x anaconda
Notice that we can specify the Python version on which the environment is going to run. This is another convenient perk of using virtual environments: we can use multiple Python versions on the same machine simply by creating multiple virtual environments corresponding to each version.
We can also create a virtual environment for R. To achieve this, simply type
conda create -n r_env_name r-essentials r-base
And now we are done! To make sure that all the virtual environments have been properly created, we can run a quick check command.
(base) Jakes-MacBook-Pro:~ jaketae$ conda info --env
# conda environments:
#
base                  *  /Users/jaketae/opt/anaconda3
BasicPython              /Users/jaketae/opt/anaconda3/envs/BasicPython
BayesPython              /Users/jaketae/opt/anaconda3/envs/BayesPython
PyTorch                  /Users/jaketae/opt/anaconda3/envs/PyTorch
R                        /Users/jaketae/opt/anaconda3/envs/R
In my case, I have created a total of 4 virtual environments, excluding the default root directory. To activate a virtual environment, we can use the source activate command. For example, if I want to activate the R virtual environment I created specifically for R, I would type
(base) Jakes-MacBook-Pro:~ jaketae$ source activate R
and I would be good to go! Objective achieved: clean the root directory and create a designated conda virtual environment for the R programming language.
Jupyter with Conda R
If you have been following along, you will realize that we still haven’t figured out a way to use Jupyter Notebooks with R. In fact, if you have been following this post so far, you will realize that you only have one kernel available on Jupyter Notebooks, and that is Python installed on the system root. To allow Jupyter Notebook to recognize each conda virtual environment, we need some tweaking to do: namely, installing kernel packages.
Let’s say I want to use Jupyter Notebook with the PyTorch virtual environment. First, let’s activate the environment.
(base) Jakes-MacBook-Pro:~ jaketae$ source activate PyTorch
Next, let’s install ipykernel, which will allow Jupyter Notebook to recognize the conda virtual environment.
(PyTorch) Jakes-MacBook-Pro:~ jaketae$ conda install ipykernel
Then, we have to link the ipykernel to Jupyter Notebooks with the following command:
(PyTorch) Jakes-MacBook-Pro:~ jaketae$ python -m ipykernel install --user --name=PyTorch
That’s it! Now, all we have to do is to repeat this process for the rest of the Python conda virtual environments. For the R virtual environment, a slightly different alteration has to be made to this procedure: instead of ipykernel, we need to install irkernel through the following command. Of course, we should execute this command after activating the R conda virtual environment.
(R) Jakes-MacBook-Pro:~ jaketae$conda install -c r r-irkernel
Now, if we boot up Jupyter Notebook, we should be able to see that there is a kernel available for every conda virtual environment!
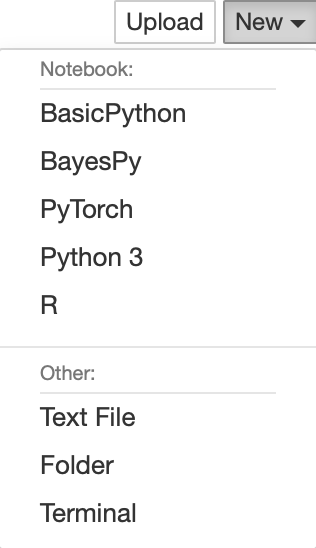
Now, we have an integrated system of virtual environments sall managed under conda, each conveniently accessible as kernels within Jupyter Notebooks!
RStudio with Conda R
Anaconda offers the option of installing RStudio through the Anaconda distribution. However, much like the vast majority of R users I saw online, I do not recommend downloading RStudio through Anaconda: the RStudio application available on Anaconda is not up to date, nor is it supported by CRAN. Instead, we can install RStudio through CRAN, but configure RStudio to locate the R profile in the Anaconda directory instead of the standard directory that would be created had we installed the R language through CRAN. This sounds a needlessly complicated, so let’s hash it out step-by-step.
Configuring RStudio
Follow this link to install the RStudio application, which is the most widely used default IDE for the R programming language. The good thing about RStudio is that it is free and open source, which is something that everybody likes. The installation should be very straight forward, so I’ll jump straight into the problem. When you complete the installation and run the application, you will run into this error message.

This message means that RStudio was unable to locate the directory where R is installed. The problem arises because we installed R through conda, not through CRAN. Therefore, we have to manually specify the Anaconda directory where R is installed for RStudio. In other words, we have to force RStudio to use a specific version of R installed on our system. This can be achieved by typing this bash command in the terminal:
export RSTUDIO_WHICH_R=some/R/directory/on/system
But how do we figure out where the Anaconda R directory is located? First, let’s activate the conda virtual environment where R is installed.
(base) Jakes-MacBook-Pro:~ jaketae$ source activate R
Next, we invoke the which R command to see where R is installed.
(R) Jakes-MacBook-Pro:~ jaketae$ which R
/Users/jaketae/opt/anaconda3/envs/R/bin/R
Great! Now we know where the R profile is. All we have to do is use the export command to configure the R directory for RStudio. In my case, this would look as follows:
export RSTUDIO_WHICH_R=/Users/jaketae/opt/anaconda3/envs/R/bin/R
And now we are done! Well, almost. If you try to open RStudio, it will still show you the same error. Instead of opening the app via the launchpad, we have to open RStudio through the same terminal we used to configure RStudio. In other words, in the same terminal window, type
cd
cd /Applications
open RStudio.app
Now, RStudio should boot up and you should be able to use it without any problems!
Creating Alias
This approach works, but it’s also inconvenient because we have to go through this process every time when we want to open up RStudio. Not really productive, is it?
The way to go about this problem is to create a shell alias. An alias is basically a personalized command on the terminal that we can invoke. Using an alias, we can also chain multiple bash commands into a sweet, single line. Pretty convenient, isn’t it? It also suits our purpose because essentially the steps we have to take to launch R is type multiple commands on the shell interface before finally launching RStudio from the terminal.
To create a system-wide alias, we have to add an alias to our bash profile. First, let’s locate the bash profile on our system in the root directory
(base) Jakes-MacBook-Pro:~ jaketae$ cd
(base) Jakes-MacBook-Pro:~ jaketae$ ls -la
total 320
# many entries
-rw-r--r--@   1 jaketae  staff    891 Dec 30 05:15 .bash_profile
# many entries
This is what shows up in my terminal. It tells me that there are 320 files in the root directory, one of which is the .bash_profile file that we have to edit to make our alias system-wide and permanent. Let’s open the .bash_profile.
(base) Jakes-MacBook-Pro:~ jaketae$ open .bash_profile
A text editor will pop up, allowing us to view and edit the contents of the .bash_profile. After the last line of the profile, add the following lines.
alias launchR='export RSTUDIO_WHICH_R=/Users/jaketae/opt/anaconda3/envs/R/bin/R; cd /Applications; open RStudio.app'
The alias I created is launchR. Essentially, what it does is that it chains multiple linux command lines into one convenient command that I can invoke in any terminal. It will automatically configure RStudio to look for the specific Anacdona directory where R in installed in and open the RStudio application by browsing into the appropriate /Applications directory. In other words, instead of going through all the hassle, we can now simply type launchR, and RSTudio will fire up, ready for use!
Conclusion
As someone who was unfamiliar with virtual environments, bash, and command lines, this little rabbit hole down the quest of using R with conda was an interesting experience. Although all of what was dealt in this post was pretty basic and elementary tweaking, I am glad I was able to produce a working system all under conda.
Now that my R environment setup is complete, it’s time to go back to studying the R programming language. I’ve only taken a cursory look at R, but the syntax seems interesting, and there are both parallels and differences I see in comparison to other langauges I know like Python or Java. Hopefully I can get the hang of R and start using it for data analysis.
Catch you up in the next one!